
If you’re a quilter who regularly uses rulers and templates, you have likely come across the need for something that keeps those tools firmly in place. That tool is often referred to as “stables tape” (also styled as stable tape or stable-adhesive tape).
While many quilters focus on the pattern, fabric, and machine, the humble adhesive strip that prevents slipping is a key difference between clean, accurate work and frustration.
In this guide, you will learn what stables tape really is, why it matters, how to choose it, how to apply it, how to maintain it—and how to avoid the common errors many quilters face.
With detailed tips, usage scenarios, and best practices, this article is designed for both domestic sewing machine users and long-arm quilting professionals alike.
Using a high-quality stable tape ensures that your quilting rulers or templates do not shift mid-cut or mid-stitch, which can lead to inaccurate seams, inconsistent block sizes, and wasted material.
Despite its simple appearance, the correct choice of adhesive, size, and application method can significantly enhance precision and save time. Especially when working on complex blocks in 2025, where speed and accuracy matter, investing in reliable template stabilising tape is a smart move.
What Is Stables Tape and Why It Matters in Quilting
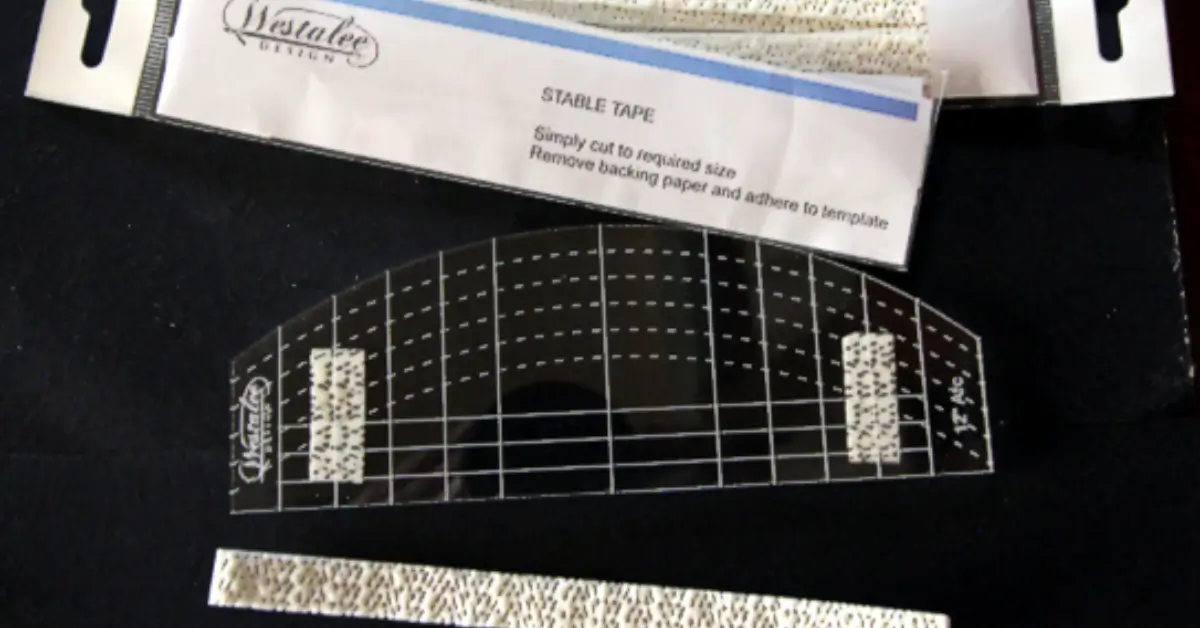
Stables tape is a self-adhesive strip or dots designed to stick to the back of quilting templates or rulers, preventing movement on the fabric surface. Over time, quilters have recognised that slipping templates can cause misaligned seams, inconsistent displacement, and frustrated corrections.
By applying stable-adhesive tape, many quilting sessions become seamless—literally and figuratively. The importance of stables tape goes beyond simply being a “sticky backing.” It contributes to the overall accuracy of cuts and quilting marks.
For domestic quilters using a standard sewing machine, the tape helps when working with small intricate patterns. For long-arm quilters working on large-scale pieces, the tape ensures that heavy templates remain stationary on the moving quilt top, promoting precision over larger surface areas.
Without this quality stabilising tool, even the best fabrics and patterns cannot compensate for slide or shift.
Key Features to Look for in Quality Stable-Adhesive Tape
Before purchasing stables tape, there are several attributes you should evaluate to ensure best performance and fabric-friendly usage.
Adhesive Strength and Fabric Compatibility
The adhesive strength of the tape must balance grip and removability. A tape that is too aggressive can damage delicate fabrics, while one that is too weak may allow the ruler or template to shift.
The optimal tape adheres securely but removes cleanly without residue. Fabric compatibility is critical: cotton quilting fabrics, silks, and textured linens behave differently under adhesive; choose tape rated for your fabric type.
Also check that the adhesive won’t yellow or weaken with time, particularly if stored under light or heat in the sewing room.
Size, Format and Ease of Application
Stable-adhesive tape comes in different formats: strips and dots. Smaller formats like dots are especially helpful when you need adhesive on small template curves or odd shapes.
Also consider how easy the tape is to cut to size and apply without wrinkles or bubbles. A fabric-friendly adhesive backing should be easy to align on the template and leave no warping or lifting during use.
Read Also: purple milk strain
How to Properly Apply Stables Tape to Your Rulers and Templates
Applying the correct adhesive tape is only half the job—you need to apply it properly for best results. Begin by cleaning your ruler or template surface: remove any fabric lint, dust, or prior adhesive residue.
A clean surface ensures full bonding. Measure and cut the tape strips or dots appropriately for the shape of your template. For straight edges, a full strip is typical; for inside curves or small sections, use adhesive dots.
Press the tape firmly onto the back of the template, avoiding air bubbles or folds. If you are working on a long-arm quilting surface, test the placement by sliding the template over a scrap fabric to confirm it holds without hitch.
Always apply enough adhesive to cover the contact area but avoid over-application; too much may leave sticky edges that attract lint or shift under pressure.
Allow the adhesive to rest for a few minutes so it bonds thoroughly before use. If you’re switching between machine stations (domestic and long-arm), mark your templates accordingly. Over time, replace the adhesive strips—especially if you notice any lift or slippage. Some experienced quilters recommend reapplying after roughly every 20–30 uses or when you change fabric types.
Maintenance, Removal and Re-application Best Practices
Once your stables tape has served its time, you’ll need to remove it cleanly and reapply fresh adhesive. Begin by gently lifting the tape from one corner, pulling slowly at a low angle to avoid pulling the template material or leaving residue.
If adhesive remains, use a fabric-safe adhesive remover and gently wipe the template back surface until clean. Before reapplying, inspect the template’s surface for scratches or damage—especially important if you use it frequently on long-arm machines or with heavier fabrics.
Replications involves repeating the cleaning, measuring, and adhering process. Store unused pieces of tape in a cool, dry place away from dust to preserve the adhesive’s quality.
In high-usage environments like quilting shops where templates are used daily, keep a supply of tape strips and dots handy and track when each template was last re-taped.
This proactive approach prevents mid-project shifts and saves time on corrections. While some may skip maintenance, the cost of a misaligned quilt block often far outweighs the cost of replacing adhesive.
Common Mistakes when Using Stables Tape and How to Avoid Them
Using stables tape can greatly aid your quilting accuracy—but only if used correctly. Poor practices can lead to frustration or worse outcomes.
Applying Too Much or Too Little Adhesive
One common mistake is over-applying the tape: too large or overlapping strips can make the back of the template uneven, causing lifting or poor contact with fabric.
On the opposite side, applying too little adhesive reduces grip and your template might shift during stitching or cutting. Always use just enough to secure the contact edge and avoid ragged or overhanging edges.
Using Tape on Incompatible Surfaces or Fabrics
Another common slip-up is assuming one tape suits all fabrics or machines. However, a template adhesive that works well on standard cotton may struggle on slick or textured fabrics, or on the moving quilt top of a long-arm machine.
Using the wrong tape may cause lifting, adhesive failure, or fabric damage. Always check manufacturer guidance, especially when switching to new fabrics or tools.
By being aware of these mistakes and actively avoiding them, you’ll find your stables tape becomes an asset rather than a burden.
Where to Buy the Best Stables Tape and What to Expect Price- and Quality-wise
When purchasing stables tape, reputable quilting suppliers reliably stock options. Expect to pay a modest amount, but consider the cost relative to wasted fabric, inaccurate templates, and time. Many quilters find value in paying slightly more for quality adhesive with less long-term hassle.
When buying: choose an authorized quilting supply store, ensure the product is genuine (especially for name-brand tape), and verify that you are buying the correct format (strips vs dots).
Also evaluate reviews: how well the tape performs after repeated use, whether adhesive remains strong after many uses, and whether residue is minimal. A good product will perform well across multiple uses, across fabrics, and will simplify your workflow rather than complicate it.
Final Thoughts
Choosing the right stables tape and applying it correctly can be a game-changer for your quilting results. With stable template adhesion, you reduce miscuts, improve accuracy, and streamline your workflow.
Whether you are sewing at home or running a long-arm studio, investing time in the right adhesive and maintenance routine pays off. Start with a trusted product, adhere carefully, maintain it wisely, and you’ll enjoy smoother quilting sessions and better outcomes.
FAQs
What is stables tape used for in quilting?
It is self-adhesive tape applied to the back of quilting rulers or templates so they remain stationary on fabric during cutting or stitching.
Can I reuse tape strips after they lose stickiness?
Most adhesive strips are designed for one full application; once they show lifting or reduced grip after about 20 uses, you should remove and reapply fresh tape.
Will stables tape leave residue on fabric or templates?
A quality product, when applied correctly and removed gently, should leave minimal or no residue on the template; avoid using it on fabric directly.
Is there a difference between strip tape and dot adhesive formats?
Yes. Strip formats are ideal for straight edges or larger templates; dot formats suit smaller, curved, or irregular templates.
Can stables tape be used on long-arm quilting machines?
Absolutely. Many products specify use for long-arm or domestic machines; the key is choosing adhesive strong enough for the moving quilt top.
How much does good stables tape cost?
Typical pricing ranges around ten to twenty dollars for a pack of strips, depending on quantity and brand.